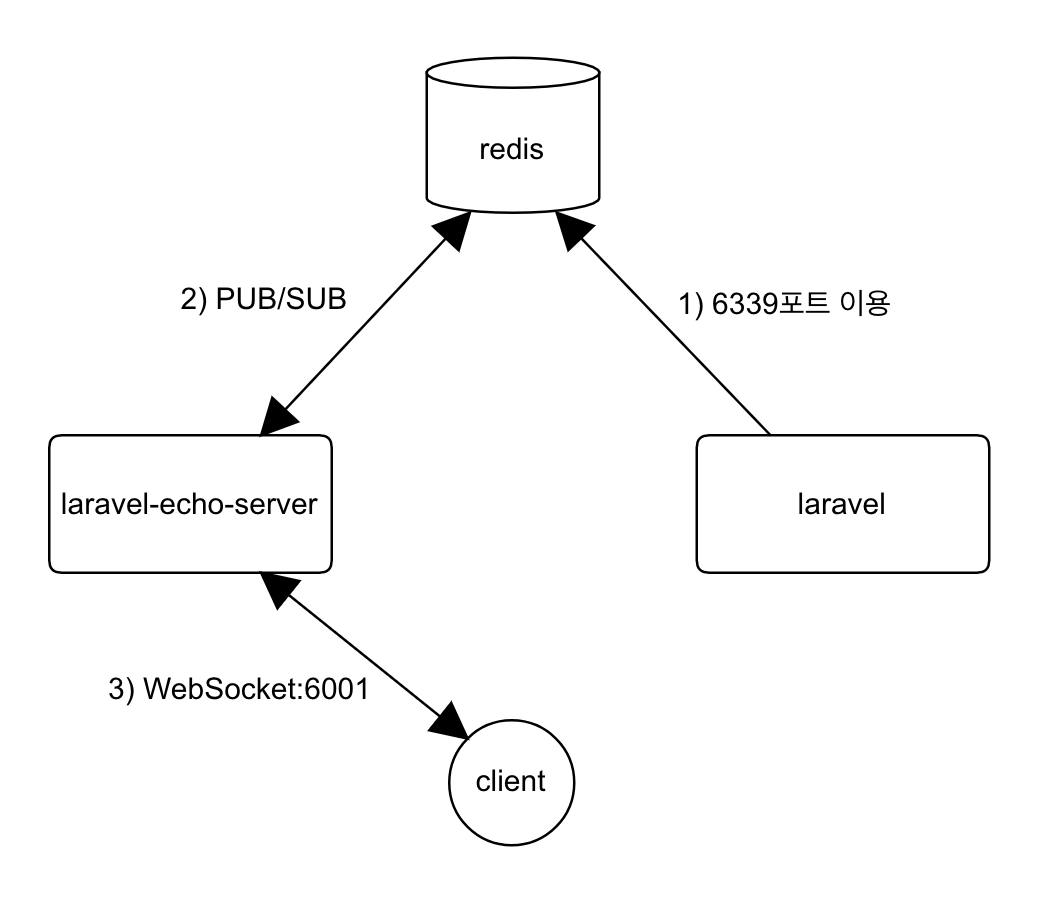
참고로 라라벨 에코서버를 이용할 때는 redis서버가 반드시 필요하기 때문에 사전작업의 redis서버를 준비해 주세요
그 후 라라벨 에코 서버 json파일을 작성해줍니다.
laravel-echo-server init
? Do you want to run this server in development mode? Yes
? Which port would you like to serve from? 6001
? Which database would you like to use to store presence channel members? redis
? Enter the host of your Laravel authentication server. http://localhost:8000
? Will you be serving on http or https? http
? Do you want to generate a client ID/Key for HTTP API? Yes
? Do you want to setup cross domain access to the API? Yes
? Specify the URI that may access the API: http://localhost:8000
? Enter the HTTP methods that are allowed for CORS: GET, POST
? Enter the HTTP headers that are allowed for CORS: Origin, Content-Type, X-Auth-Token, X-Requested-With, Accept, Autho
rization, X-CSRF-TOKEN, X-Socket-Id
? What do you want this config to be saved as? laravel-echo-server.json
appId: fb9e72802cace662
key: 9bf6eb178b5601e2353d387c9d46531b
init을 이용하면 위와 같이 설정을 할 수 있습니다.
마지막으로 라라벨 에코 서버를(laravel-echo-server start) 기동시 킵니다.
$laravel-echo-server start

L A R A V E L  E C H O  S E R V E R

version 1.5.3

Starting server...

✔  Running at localhost on port 6001
✔  Listening for http events...
✔  Listening for redis events...

Server ready!
혹시 아래와 같은 에러가 보인다면 redis서버가 준비되어있지 않은 상태이니 한번 확인해주세요!
<?php

namespace App\Events;

use Illuminate\Broadcasting\Channel;
use Illuminate\Queue\SerializesModels;
use Illuminate\Broadcasting\PrivateChannel;
use Illuminate\Broadcasting\PresenceChannel;
use Illuminate\Foundation\Events\Dispatchable;
use Illuminate\Broadcasting\InteractsWithSockets;
use Illuminate\Contracts\Broadcasting\ShouldBroadcast;

class PublicEvent implements ShouldBroadcast
{
    use Dispatchable, InteractsWithSockets, SerializesModels;

    /**
     * Create a new event instance.
     *
     * @return void
     */
    public function __construct()
    {
        //
    }

    /**
     * Get the channels the event should broadcast on.
     *
     * @return \Illuminate\Broadcasting\Channel|array
     */
    public function broadcastOn()
    {
        // redis채널이름
        return new Channel('public-event');
    }

    public function broadcastWith()
    {
      return [
        "message" => "hello world",
      ];
    }
}
@switch($number)
    @case(1)
        일
        @break
    @case(2)
        이
        @break
    @default
      다른숫자
@endswitch
@붙여 매우 간단히 foreach, for switch 구문을 사용할 수 있습니다.
조건문
@if($data == 1)
 하나
@elseif($data == 2)
 둘
@else
 다른 숫자
@endif
조건문은 if문을 사용할 수 있으며,
반복문과 마찬가지로 @를 붙여 사용할수 있습니다.
CSRF
라라 벨에서 특수한 경우가 있는데, form를 이용하여 post를 할 경우엔 CSRF를 붙여주시는 게 좋습니다.
<form method="POST" action="/post">
    @csrf
</form>
blade의 @csrf를 이용하여 사용 가능합니다.
별도의 설정 없이 post를 할 경우 @csrf를 사용하지 않는 경우에는 에러가 발생합니다.
CSRF에 대해서는 위키피디아를 참고하였습니다.
Cross-Site Request Forgery (CSRF) (크로스 사이트 요청 변조) CSRF공격은 로그온 된 피해자의 취약한 웹 애플리케이션에 피해자의 세션 쿠키와 기타 다른 인증정보를 자동으로 포함하여 위조된 HTTP 요청을 강제로 보내도록 하는 것이다. 이것은 공격자가 취약한 애플리케이션이 피해자로부터의 정당한 요청이라고 오해할 수 있는 요청들을 강제로 만들 수 있다.
트랜잭션의 클로져안에서 쿼리가 완벽하게 다 진행되었다면, 그대로 커밋을 할것이며, 실패한다면, rollback을 할 것입니다.
또한 주목할점은 보통 트랜잭션의 클로져에서는 클로져밖의 변수는 사용할수 없습니다.
아래의 예제를 보시면
try {
 $name = "hello"
 DB::transaction(function() use($name) {
  DB::select("select * from users where name=?", [$name])
})
}catch(Exception $e) {

}
use()를 사용함으로써, 밖에서 사용하던 변수라도 클로져 안에서 사용할수 있도록 합니다.
다음으로 쿼리빌더에 대해 알아보도록 하겠습니다.
쿼리빌더
쿼리빌더는 PDO 파라미터 바인딩을 사용하여 SQL injection 공격을 방지를 위해 사용할수 있으며, sql을 간단하게 작성할수 있습니다.
예제를 들어보겠습니다.
DB::table("test")->get(); // 모든 데이터 조회
DB::table("test")->first(); // 하나의 데이터만 조회
DB::table("test")->where("id","3")->get(); // where문 사용하여 해당되는 데이터 모두 조회
DB::table("test")->join("test2","test2.id","=","test.id")->get(); // join문을 사용을 사용하여 모든 데이터 조회
위의 예제들을 보시면 알수 있지만, 쿼리빌더를 이용함으로써 복잡한 sql문이 보다 간결히 작성 되는 것을 알수 있습니다.